QML Advanced Tutorial 3 - Implementing the Game Logic
Making a playable game
Now that we have all the game components, we can add the game logic that dictates how a player interacts with the blocks and plays the game until it is won or lost.
To do this, we have added the following functions to samegame.js:
- handleClick(x,y)
- floodFill(xIdx,yIdx,type)
- shuffleDown()
- victoryCheck()
- floodMoveCheck(xIdx, yIdx, type)
As this is a tutorial about QML, not game design, we will only discuss handleClick() and victoryCheck() below since they interface directly with the QML elements. Note that although the game logic here is written in JavaScript, it could have been written in Python and then exposed to QML.
Enabling mouse click interaction
To make it easier for the JavaScript code to interface with the QML elements, we have added an Item called gameCanvas to samegame.qml. It replaces the background as the item which contains the blocks. It also accepts mouse input from the user. Here is the item code:
        Item {
            id: gameCanvas

            property int score: 0
            property int blockSize: 40

            width: parent.width - (parent.width % blockSize)
            height: parent.height - (parent.height % blockSize)
            anchors.centerIn: parent

            MouseArea {
                anchors.fill: parent
                onClicked: SameGame.handleClick(mouse.x, mouse.y)
            }
        }
The gameCanvas item is the exact size of the board, and has a score property and a MouseArea to handle mouse clicks. The blocks are now created as its children, and its dimensions are used to determine the board size so that the application scales to the available screen size. Since its size is bound to a multiple of blockSize, blockSize was moved out of samegame.js and into samegame.qml as a QML property. Note that it can still be accessed from the script.
When clicked, the MouseArea calls handleClick() in samegame.js, which determines whether the player’s click should cause any blocks to be removed, and updates gameCanvas.score with the current score if necessary. Here is the handleClick() function:
function handleClick(xPos, yPos) {
    var column = Math.floor(xPos / gameCanvas.blockSize);
    var row = Math.floor(yPos / gameCanvas.blockSize);
    if (column >= maxColumn || column < 0 || row >= maxRow || row < 0)
        return;
    if (board[index(column, row)] == null)
        return;
    //If it's a valid block, remove it and all connected (does nothing if it's not connected)
    floodFill(column, row, -1);
    if (fillFound <= 0)
        return;
    gameCanvas.score += (fillFound - 1) * (fillFound - 1);
    shuffleDown();
    victoryCheck();
}
Note that if score was a global variable in the samegame.js file you would not be able to bind to it. You can only bind to QML properties.
Updating the score
When the player clicks a block and triggers c handleClick(), c handleClick() also calls c victoryCheck() to update the score and to check whether the player has completed the game. Here is the c victoryCheck() code:
function victoryCheck() {
    //Award bonus points if no blocks left
    var deservesBonus = true;
    for (var column = maxColumn - 1; column >= 0; column--)
        if (board[index(column, maxRow - 1)] != null)
        deservesBonus = false;
    if (deservesBonus)
        gameCanvas.score += 500;

    //Check whether game has finished
    if (deservesBonus || !(floodMoveCheck(0, maxRow - 1, -1)))
        dialog.show("Game Over. Your score is " + gameCanvas.score);
}
This updates the gameCanvas.score value and displays a “Game Over” dialog if the game is finished.
The Game Over dialog is created using a Dialog element that is defined in Dialog.qml. Here is the Dialog.qml code. Notice how it is designed to be usable imperatively from the script file, via the functions and signals:
import QtQuick 1.0

Rectangle {
    id: container

    function show(text) {
        dialogText.text = text;
        container.opacity = 1;
    }

    function hide() {
        container.opacity = 0;
    }

    width: dialogText.width + 20
    height: dialogText.height + 20
    opacity: 0

    Text {
        id: dialogText
        anchors.centerIn: parent
        text: ""
    }

    MouseArea {
        anchors.fill: parent
        onClicked: hide();
    }
}
And this is how it is used in the main samegame.qml file:
    Dialog {
        id: dialog
        anchors.centerIn: parent
        z: 100
    }
We give the dialog a z value of 100 to ensure it is displayed on top of our other components. The default z value for an item is 0.
A dash of color
It’s not much fun to play Same Game if all the blocks are the same color, so we’ve modified the createBlock() function in samegame.js to randomly create a different type of block (for either red, green or blue) each time it is called. Block.qml has also changed so that each block contains a different image depending on its type:
import QtQuick 1.0

Item {
    id: block

    property int type: 0

    Image {
        id: img

        anchors.fill: parent
        source: {
            if (type == 0)
                return "../shared/pics/redStone.png";
            else if (type == 1)
                return "../shared/pics/blueStone.png";
            else
                return "../shared/pics/greenStone.png";
        }
    }
}
A working game
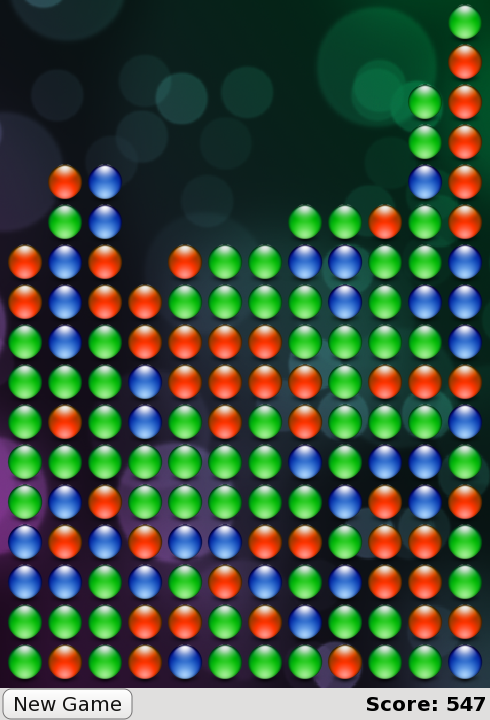
Now we now have a working game! The blocks can be clicked, the player can score, and the game can end (and then you can start a new one). Here is a screenshot of what has been accomplished so far:

This is what samegame.qml looks like now:
import QtQuick 1.0
import "samegame.js" as SameGame

Rectangle {
    id: screen

    width: 490; height: 720

    SystemPalette { id: activePalette }

    Item {
        width: parent.width
        anchors { top: parent.top; bottom: toolBar.top }

        Image {
            id: background
            anchors.fill: parent
            source: "../shared/pics/background.jpg"
            fillMode: Image.PreserveAspectCrop
        }

        Item {
            id: gameCanvas

            property int score: 0
            property int blockSize: 40

            width: parent.width - (parent.width % blockSize)
            height: parent.height - (parent.height % blockSize)
            anchors.centerIn: parent

            MouseArea {
                anchors.fill: parent
                onClicked: SameGame.handleClick(mouse.x, mouse.y)
            }
        }
    }

    Dialog {
        id: dialog
        anchors.centerIn: parent
        z: 100
    }

    Rectangle {
        id: toolBar
        width: parent.width; height: 30
        color: activePalette.window
        anchors.bottom: screen.bottom

        Button {
            anchors { left: parent.left; verticalCenter: parent.verticalCenter }
            text: "New Game"
            onClicked: SameGame.startNewGame()
        }

        Text {
            id: score
            anchors { right: parent.right; verticalCenter: parent.verticalCenter }
            text: "Score: Who knows?"
        }
    }
}
The game works, but it’s a little boring right now. Where are the smooth animated transitions? Where are the high scores? If you were a QML expert you could have written these in the first iteration, but in this tutorial they’ve been saved until the next chapter - where your application becomes alive!
[Previous QML Advanced Tutorial 2 - Populating the Game Canvas] [Next QML Advanced Tutorial 4 - Finishing Touches]


